14 Tutorial - Introduction to Git and GitHub
After completing this tutorial the student should be able to:
- Understand Git and GitHub fundamentals
- Work with repositories, commits, and branches
- Handle merge conflicts
- Implement hello world from python and see the auto-grader in action on GitHub
14.1 Version Control of Code
Version control is a systematic way to track and manage changes to code over time. Think of it like a time machine for your code that maintains the history of how your code evolved through time. It records and documents who changed what, when and why in your code. If something new that your try does not work as intended, it allows you to revert to the the previous working version of your program. Version control also allows multiple developers to work with the same code base simultaneously of different machines. This is done by each developer initiating a new branch from the common codebase and continue their individual or group development in parallel without affecting the main codebase. Once everyone is finished with their part, the changes can be merged systematically without overwriting each other’s work.
A common problem when version control is not adopted is that the entire code is maintained on a single laptop or a workstation by a single developer. When this hardware fails, the code is also lost unless a backup is maintained in a hard drive or a flash drive. The version control programs help you maintain a copy of the code on remote servers that allows your code to be protected against hardware failures.
Git is the most widely used version control system today, and GitHub is a popular platform that hosts Git repositories and adds collaboration features. Together, they’re essential tools in modern software development, used by individuals and teams from small startups to large enterprises. In this tutorial, you will be learning these concepts hands-on by working with Git and GitHub directly. Let’s get started!
14.2 Creating a GitHub account
On GitHub, your username is your identity. Follow these steps to create your account:
- Go to GitHub
- Click on “Sign up”
- Enter your email, password, and desired username
- Follow the verification steps
- Choose the free plan
Note: Choose a professional username as it will be visible in your project URLs and to potential employers.
14.3 Creating a Personal Access Token
A Personal Access Token (PAT) serves as an alternative to password authentication for GitHub. It’s a secure way to authenticate when using the GitHub API or command line.
- Go to GitHub.com and sign in
- Click your profile picture → Settings
- Scroll to “Developer settings” (bottom of left sidebar)
- Click “Personal access tokens” → “Tokens (classic)”
- Generate new token → Add note (e.g., “Course Access”)
- Select scopes:
- repo (all)
- workflow
- read:org
- Click “Generate token”
- Copy and save the token immediately - you won’t see it again
Use this token instead of your password when Git asks for authentication. Store it securely as it provides access to your GitHub account.
14.4 Installing Git
Before you can use Git, you need to install it on your computer. Follow the instructions for your operating system:
14.4.1 Windows
- Download the Git installer from Git for Windows
- Run the installer with these recommended settings:
- Select Components: Keep defaults
- Choosing default editor: Pick your preferred editor
- Adjusting PATH: Select “Git from the command line and also from 3rd-party software”
- HTTPS transport backend: Use the native Windows Secure Channel library
- Line ending conversions: Checkout Windows-style, commit Unix-style
- Terminal emulator: Use MinTTY
- Default branch name: main
- Open Windows PowerShell Prompt and verify installation:
git --version14.4.2 MacOS
- Install Homebrew if you haven’t already:
/bin/bash -c "$(curl -fsSL https://raw.githubusercontent.com/Homebrew/install/HEAD/install.sh)"- Install Git using Homebrew:
brew install git- Verify the installation:
git --versionAlternatively, Git may already be installed on your Mac. Check by opening Terminal and running git --version.
14.4.3 Ubuntu
- Update package index:
sudo apt update- Install Git:
sudo apt install git- Verify the installation:
git --version14.5 Cloning Repository from GitHub Classroom
Accept the GitHub Classroom assignment link provided by your instructor
GitHub will create a private repository for you
Clone your repository (GitHub might ask you to authenticate)
cd <path-to-folder-where-you-want-to-store-your-coursework>
git clone <your-repository-url-created-by-github-classroom>
Navigate to the root directory of your repository.
cd <your-repository-name>Verify the clone was successful:
git status- Configure your Git identity:
git config --global user.name "Your Name"
git config --global user.email "your.email@example.com"
14.6 Creating and Committing a New File
- Navigate to the
ros2_ws/src/student/tut_02directory and create a new file namedtest.md:
cd ros2_ws/src/student/tut_02
touch test.md- Add the following content to
test.md:
# Test File
This is a test file for the git tutorial.- Add the new file to the repository:
git add test.md- Commit the new file to the repository with a meaningful message:
git commit -m "Add test.md file for git tutorial"- Push the changes to the remote repository:
git push origin main14.7 Working with Branches and Resolving Conflicts Locally
- Create a new branch:
git checkout -b new-feature- Modify
ros2_ws/src/student/tut_02/test.mdin the new branch:
# Test File
This is a modified test file for the git tutorial.- Add and commit the changes in the new branch:
git add ros2_ws/src/student/tut_02/test.md
git commit -m "Modify test.md in new-feature branch"- Switch back to the main branch:
git checkout main- Modify
ros2_ws/src/student/tut_02/test.mdin the main branch:
# Test File
This is a different modification in the main branch.- Add and commit the changes in the main branch:
git add ros2_ws/src/student/tut_02/test.md
git commit -m "Modify test.md in main branch"- Merge the
new-featurebranch into themainbranch (this will cause a conflict):
git merge --no-ff new-featureCheck the file ros2_ws/src/student/tut_02/test.md and see how git has shown you the conflict.
- Resolve the conflict in
ros2_ws/src/student/tut_02/test.mdby manually editing the file to combine the changes:
# Test File
This is a test file for the git tutorial.
This is a modified test file for the git tutorial.
This is a different modification in the main branch.- After resolving the conflict, add and commit the resolved file:
git add ros2_ws/src/student/tut_02/test.md
git commit -m "Resolve merge conflict in test.md"- Push the changes to the remote repository:
git push origin main14.8 Pull Requests
The above described method works fine when you are working alone on a repository. In this case both the new branch and the main branch are maintained by the same person. However, in a real collaborative environment, the main branch is maintained by, say an administrator, and the developers work on their own branches. Several times, multiple developers work on the same file (e.g., a python script) on thier own branches. If the developer tries to merge their branches into the main branch, there will be conflicts. However, these conflicts cannot necessarily be resolved by the developer trying to merge their branch. Instead the resolutions of the conflicts requires the input of multiple developers as some of the code in the branch might conflict with the development done by other developers. This is where the pull requests come into play.
Here we shall see how to use pull requests to resolve conflicts in the remote repository on GitHub.
- Create a new file in the main branch:
cd ros2_ws/src/student/tut_02
touch test.py- Copy the following contents into
test.pyusing the text editor of your choice and save the file:
# Hello World Comment Line

def add(a, b):
  pass

def subtract(a,b):
  pass

if __name__ == "__main__":
  a = 5
  b = 6

  print(f"Add {a} and {b} to get {add(a,b)}")
print(f"Subtract {a} from {b} to get {subtract(a,b)}")- Add and commit the changes in the main branch:
git add test.py
git commit -m "Add test.py file"- Push the changes to the remote repository:
git push origin mainNow, we will assume that there are two developers, Rishabh and Vallabh, who are working on the same file test.py on their own branches. Rishabh will implement the add function and Vallabh will implement the subtract function.
- Rishabh will create a new branch and implement the
addfunction:
git checkout -b rishabh-add- Rishabh will implement the
addfunction and the new filetest.pywill be updated to:
# Summer is here

def add(a, b):
  return a + b

def subtract(a,b):
  pass

if __name__ == "__main__":
  a = 5
  b = 6

  print(f"Add {a} and {b} to get {add(a,b)}")
  print(f"Subtract {a} from {b} to get {subtract(a,b)}")
Notice that Rishabh has also changed the comment line to “Summer is here”.
- Rishabh will add and commit the changes:
git add test.py
git commit -m "Implement add function"
As of now, Rishabh’s code is still on his local machine. He needs to push his changes to the remote repository.
- Rishabh will push his changes to the remote repository:
git push origin rishabh-add- While Rishabh was working on his branch, Vallabh too created a new branch from the main branch and implemented the
subtractfunction on a different computer:
git checkout main
git checkout -b vallabh-subtract- Vallabh will implement the
subtractfunction and the new filetest.pywill be updated to:
# Winter is here

def add(a, b):
  pass

def subtract(a,b):
  return a - b

if __name__ == "__main__":
  a = 5
  b = 6

  print(f"Add {a} and {b} to get {add(a,b)}")
  print(f"Subtract {a} from {b} to get {subtract(a,b)}")
Notice that Vallabh has also changed the comment line to “Winter is here”.
- Vallabh will add and commit the changes:
git add test.py
git commit -m "Implement subtract function"- Vallabh will push his changes to the remote repository:
git push origin vallabh-subtractNow, Rishabh and Vallabh have implemented their functions on their own branches and pushed them to the remote repository.
- Rishabh will create a pull request to merge his branch into the main branch:
This can be performed by navigating to the repository on GitHub and clicking on the “Pull requests” tab and then clicking on the “New pull request” button. This should open up a new page as shown in Figure 14.1. Here select the branch rishabh-add as the compare branch and the branch main as the base branch. Then click on the “Create pull request” button. Rishabh will be prompted to give a title and description for the pull request.
Notice from Figure 14.1 that during the creation of the pull request, GitHub shows the message “Able to merge”. This means that the pull request can be merged into the main branch without any conflicts.

You can navigate to the pull request page by clicking on the “Pull requests” tab and then clicking on the pull request you just created. This should open up a new page as shown in Figure 14.2.
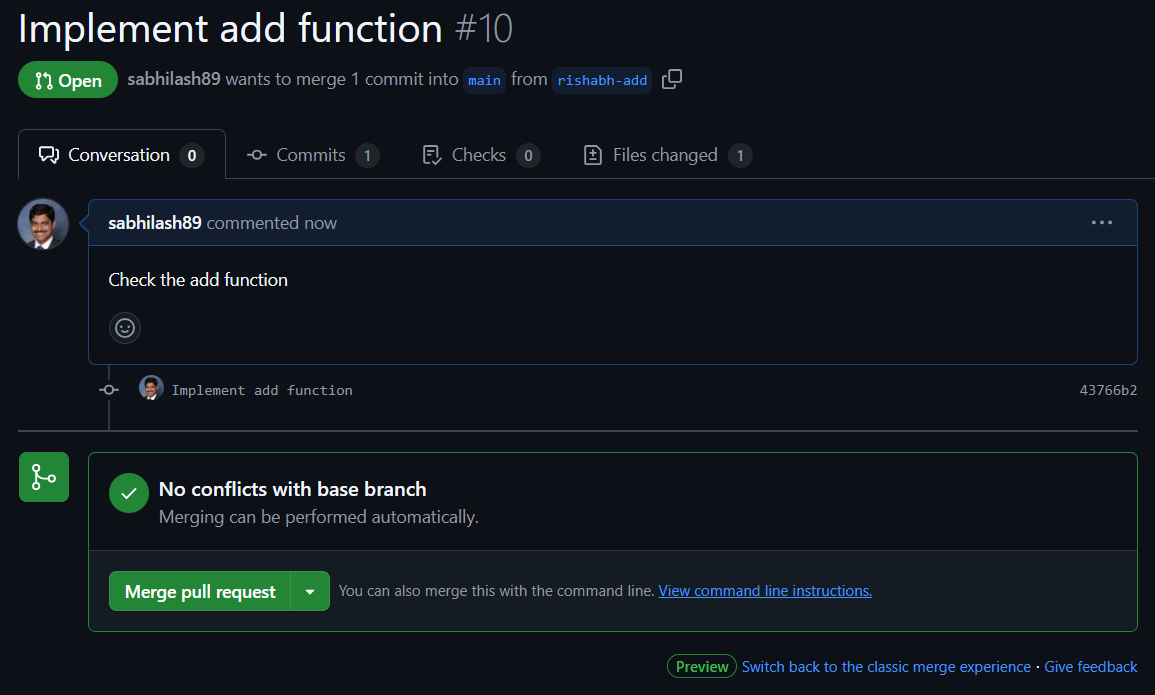
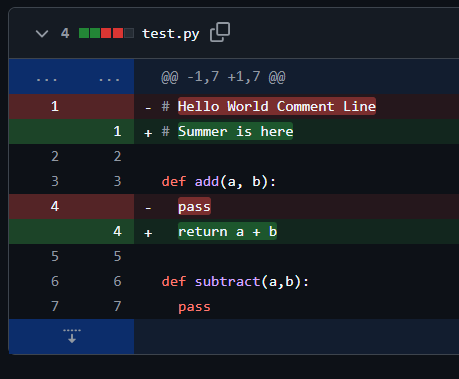
Notice that here too GitHub shows the message “No conflicts with the base branch. Merging can be performed automatically”. If you click on the “Files changed” tab, you will see the additions made by Rishabh in green and the parts of the main branch that were deleted in red.
- Rishabh will merge his pull request into the main branch:
This can be performed by clicking on the “Merge pull request” button on the conversation tab of the pull request page (followed by clicking on the “Confirm merge” button). This will merge the pull request into the main branch. We can delete the branch rishabh-add as it is no longer needed.
- Now, Vallabh will create a pull request to merge his branch into the main branch:
This can be performed by navigating to the repository on GitHub and clicking on the “Pull requests” tab and then clicking on the “New pull request” button. This should open up a new page as shown in Figure 14.4. Here select the branch vallabh-subtract as the compare branch and the branch main as the base branch. Then click on the “Create pull request” button. Vallabh will be prompted to give a title and description for the pull request.

Notice that here GitHub shows the message “Can’t automatically merge”. This means that the pull request can be created but cannot be merged automatically into the main branch due to conflicts. This has happened because while Vallabh implemented the subtract function, Rishabh’s add function was added into the main branch through the pull request we created earlier. Thus the main branch has diverged from the vallabh-subtract branch.
You can navigate to the pull request page by clicking on the “Pull requests” tab and then clicking on the pull request you just created. This should open up a new page as shown in Figure 14.5.
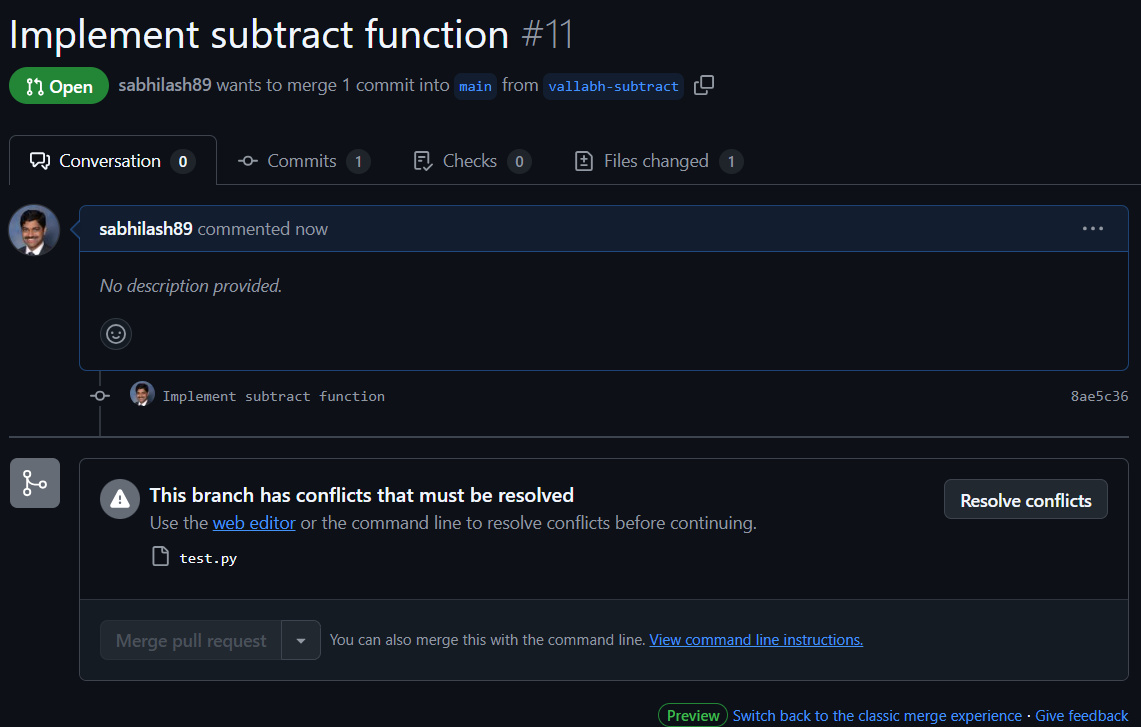
Notice here too GitHub shows the message “This branch has conflicts that must be resolved”. It shows that the conflicts exist in the file test.py. If we click on the “Resolve conflicts” button, we will be redirected to the file test.py with the conflicts in a web editor.
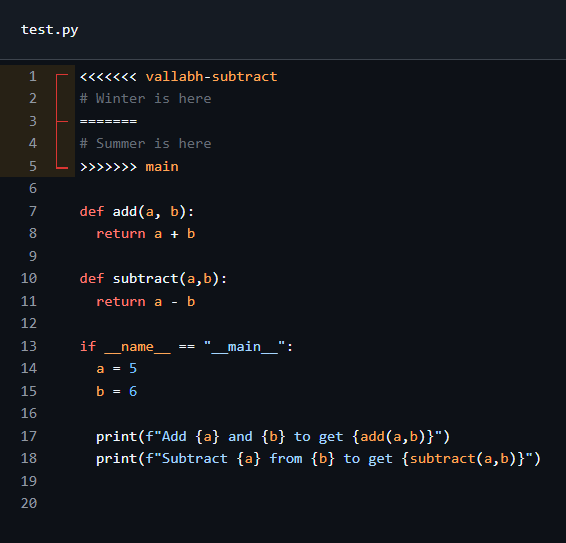
Now we can see that the conflict is indicated as we saw happen during the git merge operation.
<<<<<<< vallabh-subtract
# Winter is here
=======
# Summer is here
>>>>>>> main
This can be resolved by manually editing the file on the web editor to combine the changes. The new file should look like this:
# Winter is here

def add(a, b):
  pass

def subtract(a,b):
  return a - b

if __name__ == "__main__":
  a = 5
  b = 6

  print(f"Add {a} and {b} to get {add(a,b)}")
  print(f"Subtract {a} from {b} to get {subtract(a,b)}")
After editing the file, we can click on the button “Mark as resolved” and then click on the “Commit merge” button to commit the changes into vallabh-subtract branch. After this step, we will be redirected to the pull request page as shown in Figure 14.7.
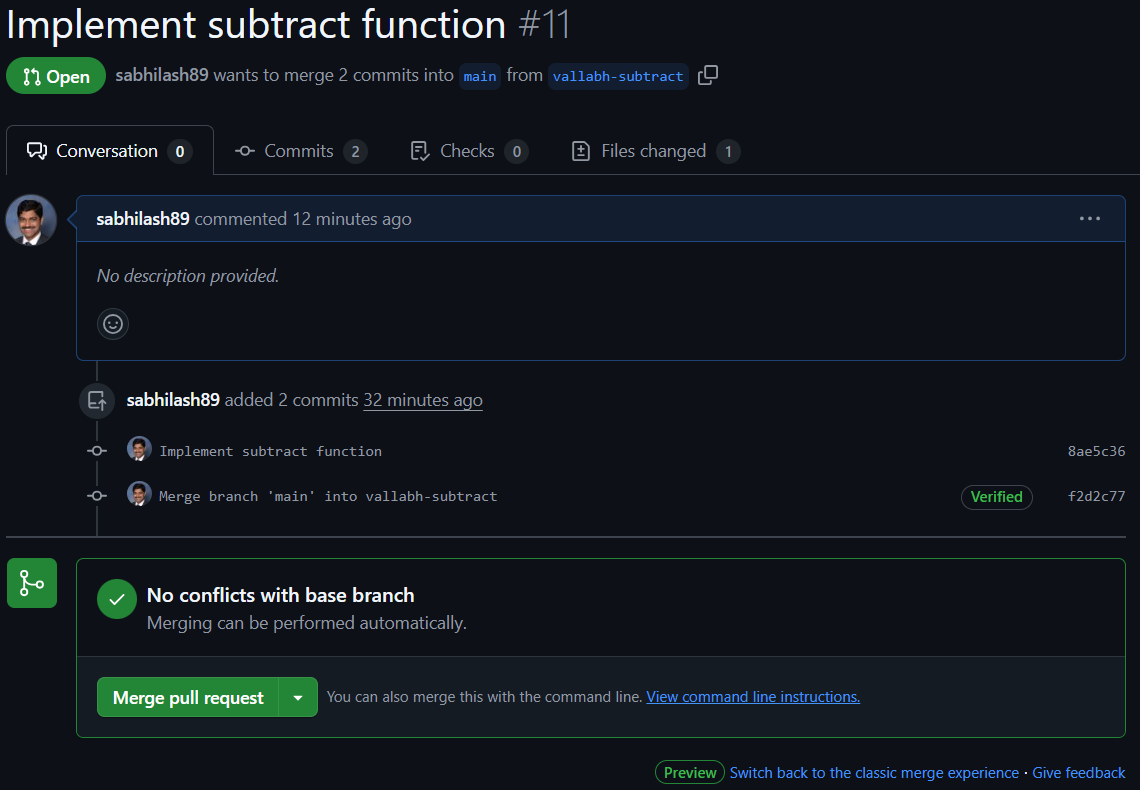
Here we see that the a new commit has been added to the vallabh-subtract branch with the message “merge branch ‘main’ into vallabh-subtract”. Let’s try to understand what this means. We have now made changes on vallabh-subtract branch to incorporate the changes from the main branch and now this branch is ahead of the main branch by 2 commits. This means that the pull request can be merged into the main branch without any conflicts. Notice that here GitHub shows the message “No conflicts with base branch. Merging can be performed automatically”.
However, before we close the pull request, we observe that the subtract function is not quite correct. It should return the difference b-a instead of a-b. We would now like to make the necessary changes to the subtract function on our local machine. However, we have made some changes on the remote repository that are not yet reflected on our local machine. We can pull the changes from the remote repository to our local machine using the following command:
git pullThis will throw up an error as shown below:
remote: Enumerating objects: 10, done.
remote: Counting objects: 100% (10/10), done.
remote: Compressing objects: 100% (4/4), done.
remote: Total 4 (delta 2), reused 0 (delta 0), pack-reused 0 (from 0)
Unpacking objects: 100% (4/4), 1.85 KiB | 1.85 MiB/s, done.
From https://github.com/mavlab-courses/pr_example
   1fc63ab..44d7cbc  main             -> origin/main
   8ae5c36..f2d2c77  vallabh-subtract -> origin/vallabh-subtract
There is no tracking information for the current branch.
Please specify which branch you want to merge with.
See git-pull(1) for details.

    git pull <remote> <branch>

If you wish to set tracking information for this branch you can do so with:

    git branch --set-upstream-to=origin/<branch> vallabh-subtract
Since we have initiated a pull request and also performed a merge operation, we need to point our local branch to the remote branch. This can be done by running the following command:
git branch --set-upstream-to=origin/vallabh-subtract vallabh-subtractNow we can pull the changes from the remote repository to our local machine:
git pullThis will pull the changes from the vallabh-subtract branch to our local machine. Now we can make the necessary changes to the subtract function on our local machine.
def subtract(a,b):
  return b - a
We can add and commit the changes:
git add test.py
git commit -m "Fix subtract function"
We can push the changes to the remote repository:
git push origin vallabh-subtractThis will push the changes to the vallabh-subtract branch on the remote repository.
- Vallabh will merge his pull request into the main branch:
This can be performed by clicking on the “Merge pull request” button on the conversation tab of the pull request page (followed by clicking on the “Confirm merge” button). This will merge the pull request into the main branch. We can delete the branch vallabh-subtract as it is no longer needed.
Now when we navigate to the repository on GitHub and see the test.py file on the main branch, we should see the following:
# Winter is here

def add(a, b):
  return a + b

def subtract(a,b):
  return b - a

if __name__ == "__main__":
  a = 5
  b = 6

  print(f"Add {a} and {b} to get {add(a,b)}")
  print(f"Subtract {a} from {b} to get {subtract(a,b)}")
Congratulations! You have now successfully implemented a pull request and resolved a merge conflict where two developers were working on the same file. While this can be an overwhelming process when you are doing it for the first time, it becomes easier with practice.
14.9 Implementing Hello World
- Navigate to the
ros2_ws/src/student/tut_02directory and openhello.py:
cd ros2_ws/src/student/tut_02
code hello.py- Implement the
hello_world()function:
def hello_world():
    # TODO: Return the string "Hello, World!"
pass- Commit your changes:
git add hello.py
git commit -m "Implement hello_world function"
git push origin main
14.10 Additional Git Functionalities (Optional)
14.10.1 Viewing Commit History
To view the commit history, use:
git log14.10.2 Reverting Changes
To undo the last commit while keeping the changes in your working directory:
git reset --soft HEAD~1To completely undo the last commit and discard changes:
git reset --hard HEAD~1To revert a specific commit while keeping history:
git revert <commit-hash>To undo changes in a specific file before committing:
git checkout -- <filename>14.10.3 Stashing Changes
To temporarily save changes without committing:
git stash save "work in progress"To list stashed changes:
git stash listTo apply the most recent stash:
git stash popTo apply a specific stash:
git stash apply stash@{n}To drop a specific stash:
git stash drop stash@{n}14.11 Evaluation
The evaluation of the tutorial will be performed in the classroom. Notice that this is a group activity. You will be working in a group of 4 students. The evaluation will be performed on the group level. In order to pass the tutorial, the group must pass all the tests in the GitHub Actions workflow and also be able to answer all the questions during the evaluation in the classroom. Those who are not present in the classroom on the day of evaluation will not be able to participate in the evaluation and will automatically fail the tutorial.
Some questions to think about while you are working on the implementation tasks:
- What is the difference between a commit and a branch?
- What is the difference between a remote and a local repository?
- What is the difference between a push and a pull?
- What is the difference between a pull request and a merge? Which is more important in collaborative development and why?
- How do pull requests help in collaborative development?
- How do you resolve merge conflicts?
14.12 Instructor Feedback through Pull Requests
Commit your changes to the remote repository often. This will help you to track your progress and also help you to revert to a working version if you make a mistake. In addition, the instructor and TA will be able to provide you with feedback on your code through the Feedback pull request available in your repository. Please do not close this pull request.